
Range of Light Photography | Range of Light Photography™ | Techniques | Print Presentation
Print Presentation
Table of Contents


While loose prints store easily and occupy a minimum of space, they are a professionally less desirable way to show your hard work. Mounting and windowing a print allows the artist to determine the exact display condition and environment of his/her aesthetic choosing. Opinions vary as to the archival aspects of various presentations, but the classic way of presenting fine art photographs, whether for portfolio or framing, is to mat and window them.
TO DRY MOUNT OR NOT TO DRY MOUNT
The arguments against dry mounting fine art photographs are based upon the fact that the photograph is more or less permanently affixed to the supporting mount, and cannot easily be removed. This notion is promulgated primarily by art galleries and museums, who prefer loose prints per their own display preferences and storage requirements. All I can say, is that if a gallery's concern over your art trumps your own artistic bent, you are either in a position of not needing to read this article or are willing to subjugate your aesthetic principles to others.
That said, I consider two methods of mounting to be both useful and valid. One may forego the permanent dry mounting process by hinge mounting with archival linen tape and overmatting the photograph with a window. I actually use this method with color prints (rare). The downsides of this time-honored procedure are that the print must be exposed with clean borders (by use of a good 4-bladed easel, for instance), of sufficient width to be held effectively by the overlapped window. This will likely reduce the printed area of the photograph substantially, turning a nominal 11" X 14" print into a 9" X 12" print when using a minimum one inch border. This border size would accommodate a half inch of reveal (where the print itself may be signed) with a half inch of window overlap to secure the print against its mat board. This method becomes problematic with increasing print size and the use of truly archival printing materials – fiber based papers, which resist lying (or, hanging) flat as resin-coated (plastic) monochrome and color papers do. Overmatting can have a more aesthetic consequence. If the print borders are insufficiently large, the window may intrude into the printed region of the photograph, as is typical when many vintage prints are exhibited. In this case, the technician responsible for presenting the work will decide where borders of the print start and stop – not the artist.
This article and supporting video is about the other method – dry mounting. Though dry mounting also has its (t)issues, it remains the best of all presentation methods. I look at it this way, a loose print is unprotected against injury on all sides. Dry mounting with archival materials provides support and protection for the photographic art piece on all but the printed side, allowing it to be handled safely. When floated into a suitable window to hold framed glazing apart from the print's viewing surface, it becomes a fully protected (assuming it is not exposed to regular direct sunlight) and identifiable art piece, presented as the artist intended.
Returning briefly to the venerable museum or gallery concerns, I would note that neither would likely require that an authentic Frederic Remington Bronze be separated from its rather substantial supporting pedestal for ease of storage. I believe it is incumbent upon the work's creator to determine the immediate condition of display. For the photographic artist this includes the size, positioning, and color of the work's support. In consideration of this, my primary objective is to present prints in the most neutral way possible. That is, I want the actor (print) – not the stage (matting and framing) – to star in the performance.
- Tip #1 – Don't mount all of your prints. That would be prohibitively expensive, and then you might have the storage problem. Store loose copies safely, interleaved with tissue within archival boxes, so that when the MOMA does come a callin' you may accede to their demands!
Materials:
Paper Trimmer
Mounting Press
Tacking Iron
Dry Mount Tissue
4-Ply Archival Mounting Board
Carpenter's Square
Shot Bag
Before starting the mounting process I sketch up a diagram of the trimmed print on its mount and one of its window, with all measurements clearly defined. Once cleaned up and digitized, I retain a binder and computer file full of sketches containing every size and orientation of print mounts and windows, so that I don't have to keep "re-inventing the wheel". Note that the sketches are representational and not to scale.
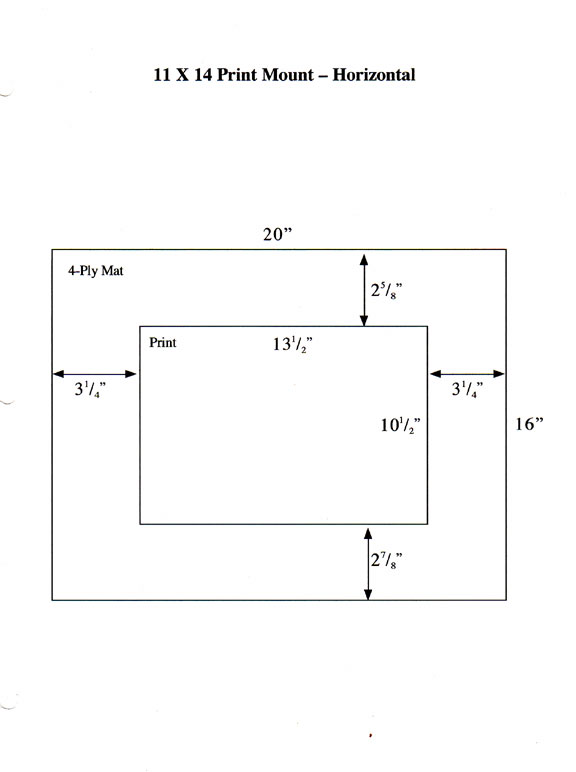

Begin by downsizing a sheet of 4-ply mat board to the desired size per print with the straight cutter on the Framer's Edge. I start with 60"X40" full sheets of 100% cotton rag, buffered museum board. In order to provide the most consistent look possible, I use Legion Paper's Rising Museum Board (white, see Resources) for all mounts (4-ply) and windows (8-ply). Below is a listing of my mount sizes for various finished prints.
| Trimmed Print Size (Aspect Ratio): | Mat Size: | ||
| 101/2" X 131/2" (4:5) | 81/2" X 133/4" (3:5) | 63/4" X 131/2" (1:2) | 16"X20" |
| 151/2" X 191/2" (4:5) | 121/2" X 193/4" (3:5) | 10" X 20" (1:2) | 24"X30" |
| 191/2" X 231/2" (4:5) | 143/4" X 233/4" (3:5) | 111/2" X 23" (1:2) | 28"X34" |
| 24" X 30" (4:5) | 18" X 30" (3:5) | 15" X 30" (1:2) | 32"X40" |
| 291/2" X 391/2" (4:5) | 24" X 40" (3:5) | 20" X 40" (1:2) | 36"X48" |
Note that by standardizing mat sizes within an aspect ratio based on the longest print dimension, prints of varying aspect ratios may be displayed together satisfyingly using identical frame size on the same wall. I often pre-cut several mount boards and windows at a time, depending on the job, to steamline the mounting process.
- Tip #2 – It would be advantageous to pre-flatten the print in the mounting press in order to smooth the process and drive excess moisture out, if you haven't already done so.
The first step is to tack mounting tissue to the back of the untrimmed print with a pre-heated tacking iron. Mounting tissue comes in a variety of flavors, with Bienfang's (formerly Seal) BufferMount being most commonly available as of this writing. I prefer the no longer available Seal MT-5 Mounting Tissue for mural sized prints as its adhesion to mount board is superior to all others. BufferMount is recommended for standard size prints as it will allow the removal of the print from the mat upon reheating (making the dry mounted print truly (?!?) archival). My concern with BufferMount and large prints involves its proclivity to release the print unexpectedly as heat builds up within a framed and glazed piece if sunlight intrudes.

Place the untrimmed print face down on a clean surface and position a sheet of mounting tissue on top.
- Tip #3 - Do not allow the tissue to overlap the print on 2 of the sides. This will allow abutment of the print and tissue next to squaring bar without it springing back as the first trim is made.
Draw an 'X' (or whatever hieroglyph you prefer) with a constantly moving, pre-heated tacking iron. Using only light pressure and allowing the weight of the iron itself to melt the tissue as it glides onto the back of the print will prevent the print surface from becoming indented.

Place the freshly tacked print/tissue combination onto your paper cutter print side up with an unencumbered print edge against the squaring bar and begin making trim cuts to remove the unexposed borders. I use a 40 inch RotaTrim rotary style cutter, but others enjoy success with professional guillotine style cutters. Every cut should be removing both print and tissue – the idea being that you end up squaring a piece of attached tissue to precisely the same size as the print. Rotating the print through the cuts seems to make sense. Refer to your mounting notes as you make final trim cuts to the print's desired size. The measurement grid on the Rotatrim makes cutting the appropriate amount quick and easy. The use of cotton gloves is highly recommended from this point on, as touching the print's surface is all but avoidable.
Examine the mat board to make certain the side to be mounted exhibits no visible imperfections. Place the trimmed print/tissue combination onto the mat and position it according to your mounting notes, either with a carpenter's square or a commercial print positioning device. I have the found the latter to be maddeningly inaccurate, and since I always re-check the exact dimensions with a ruler anyway, I prefer the direct reading of measurements from the carpenter's square. The subject of some interpretation, some degree of "bottom-weighting" is normally applied to the vertical orientation. This is an entirely subjective attempt, more art than science, at overcoming the optical illusion of being below dead center, while actually precisely centered. The print is raised some small amount in order to overcome this visual trickery. Practically, this can be whatever looks good to the eye, but is also dependent on the size of the mat, the bordering "white space", and whether the mount is landscape or portrait. My own attempts vary from 1/8 inch on 11"X14" standard (4:5) portrait, to 3/4 inch on 28'X40" widescreen (3:5) landscape orientations. Some people prefer the print to be visibly and obviously raised above the apparent center point. I do not.
- Tip #4 - A shot bag can easily be constructed by sewing up a bag with – shot inside (duh!).
Although not required, the application of a shot bag to hold the print on the mat, will ease the tacking process considerably. Once in final position, carefully lift a corner of the print, allowing the mounting tissue to separate, and use the tacking iron to bond the tissue to the mat board. Repeat until at least 3 corners have been tacked. What you now have is the print tacked centrally to the tissue, and the tissue tacked to the mat board at the corners. The whole print-tissue-mat sandwich is now stabilized and may be moved securely into the mounting press.
Heat the mat and attached print within the mounting press between to clean sheets of 4-ply mat board just long enough to melt the tissue. The time required varies according to the press and the type of tissue. Consult the mounting tissue manufacturer for recommendations. Two minutes at 210ºF in my preheated Seal 210M-X usually does the job.

Once pressing is completed, remove the mounted print and place under weight, allowing it to cool. Remember that mounting tissues actually adhere during the cooling phase. My "cooling press" is a three-quarter inch melamine panel upon which I have attached a handle, covered with 1-ply archival barrier paper (which may be replaced as required) supported by a table of sufficient size to handle my largest prints. I often throw a heavy metal tool box on top to increase the weighted pressure, ensuring a good print–to–mount bond. Once cool, remove the mounted print and bend the mount aggressively at the corners to test the bond. Return to the press and repeat the process if bonding is incomplete.

A standard size mounting press is capable of mounting up to 16"X20" prints in one shot. Larger and mural sized prints may be accommodated by pressing in sections. I find that, in combination with the associated mount board, 20"X24" prints can be pressed easily with two overlapping sections, each receiving a normal amount of pressing time.
Mural sizes of 30 inches in the longest dimension (with a corresponding mount of 40 inches – see mount sizes), and larger up to 40 inches (with a mount of 48 inches), must be addressed somewhat differently. Large fiber based prints with tacked tissue can become unwieldy in a standard size press. They may be pressed by rotating the print through four quadrants. It is advisable to support the protruding mount as you press, so that your carefully trimmed tissue doesn't pull and wrinkle under the print.
Begin by pressing the first quadrant for about one minute at your normal pressing temperature, just enough time to melt the mounting tissue and begin a light bond between the print and mount. Rotate through the second quadrant, smoothing the area to be pressed with a cotton-gloved hand in order to avoid wrinkling. Press the second section for the same amount of time as the first quadrant. Continue the procedure of rotating – smoothing – pressing until all four quadrants are completed. If, after any point in this initial light pressing, any wrinkles appear, the print may be carefully separated from the mount, smoothed and re-pressed. This is the reason for applying only light adhesion during the first round! Once the print has been lightly bonded and inspected for wrinkles, return the print again to the press for a full round of pressing each section at normal time and temperature, overlapping quadrants as you go. Place under weight to complete adhesion and cool.
Materials:
Framer's Edge
8-Ply Archival Mat Board
Sharp Pencil & Gum Eraser
In my estimation, nothing sets the stage more professionally, protects the print's surface from glazing better, or completes the presentation more dramatically than "floating" a fine art print within a beautifully beveled window of 8-ply archival mat. To this end, I use a Logan Framer's Edge, which employs a cutting bar upon which ride both straight and bevel cutter tools. Sure, you can buy cutters separately from an art store and use them with a straight edge. But, these become quite impractical for large mounts and aesthetic outcomes. The Logan series of mat cutters are low-medium priced options for delivering professional looking results, when thoughtfully used. I am able to cut mats and windows all for all of the sizes listed above with the 48 inch version.

- Tip #5 – Before cutting expensive mat board, practice on scrap material as necessary.
Once again, begin by inspecting the mat board for imperfections. The "bad" side, if there is one, is where you will mark lines for cutting. Refer to your windowing notes for the appropriate dimensions and adjust the machine's mat guide to the desired window border width and begin drawing cutting lines. I have standardized upon a half inch "well" which surrounds the mounted print. Complete lines are not fundamentally necessary, as only the line intersections need be clearly visible. Rotate the mat and re-adjust the guide as necessary.
- Tip #6 – Always use a "backing sheet" of scrap 4-ply or other suitable material underneath as cuts are likely to become ragged as the blade cuts through the window mat without it.


Cutting may commence once all lines (intersections) are drawn, adjusting the mat guide as required. Starting and ending the cuts requires some amount of experience with the particular mat and device. Do not fret unduly upon the occasion of minor "overcuts", say less than 1/16 inch, as the geometry of some window cutting systems and mat thicknesses simply cannot be overcome, no matter how precise the technique. Small overcuts tend to "heal" themselves, at least visually when using good rag board, once placed under glazing and framed.
- Tip #7 – Replace cutter blades frequently, and always before important cuts.
After the fourth side is cut, carefully withdraw the mat from the machine and allow the window "pane" to drop out. With luck, or better yet, skill, the entire pane should be free. If it begins to hang by a corner (e.g., it was "undercut"), immediately support the pane with one hand and the window "frame" with the other, as you remove it from the device. Do not let the weight of the pane drop and tear out the corner! ...and most of all, Do not panic! Simply flip it upside down so that the beveled window edge now supports the pane. Carefully slice at a 45 degree angle (and at the same angle as the bevel edge) freehand with a single-edged blade (perhaps a used one from the bevel cutter) towards the recalcitrant corner to finish the cut, until the pane is freed.
- Tip #8 – Don't despair if the pane does happen to tear out a corner. Use your single-edge blade to cut out the torn "ear" of mount material, and "sand" lightly with an emory board to dress it up.
Inspect the window and erase any pencil markings on the window's back, as these will tend to rub onto the face of the print's mount when put together. Check the window with the print to confirm (and admire) your skill. The finished fine art print piece may then be signed within the print mount's lower "well". Don't forget to fill out any print specific information within the provenance label, on the back of the mount.

- Tip #9 – Save the window "panes" and true the edges for smaller window sizes.
Although this article's supporting photos and video show the mounting of an 11"X14" fiber print onto 16"X20" mat board, I use the very same equipment to mount prints up to 30"X40" on 36"X48" board. With a little luck, a modicum of skill, and a lot of perseverance, you may have admirers of your work asking, "Who does your mounting?"
With respect to framing, my maxim for display in consideration of making certain that the print takes center stage, is to frame in the most neutral way possible. To this end, I use simple black brushed metal (Nielsen) frames for shows and personal use. Be aware that some frames may have insufficient depth to accommodate 8 ply matting materials. The question of glazing material is really a practical one. Glass is beautiful, easy to clean, fairly scratch resisitant, and cheap. Glass, however, is quite impractical in seismically active regions or for transport. I have never been able to travel with glass frames without losing (i.e., cracked or shattered) at least one. The risk that broken glazing may injure either the print or its mount may be avoided entirely with the use of acrylics. Although acrylic glazing is expensive, scratches easily, and may be difficult to keep clean, the protection afforded the numbered and editioned fine art print more than makes up for its shortcomings.


8 个留言
Mark Larsen: on 一月, 2012
Thanks for any insights!
Mark
Ben: on 一月, 2012
I don't stamp with inked blanks at all, though that is a perfectly acceptable way of structuring identification on prints and or mounts. I print blank labels directly on paper, which are then mounted with tissue, just as is the print itself, on the back of the mount board of GSP's, or adhesive labels for direct application to non-archival materials (all non–permanently mounted color or resin prints). All labels are completed in pencil once on the finished work. It is traditional to sign and identify work in leaded pencil, which doesn't smear. The blank itself may have an unlikely potential to smudge (ink, toner, whatever), but the all important specific identifying information should not. Any penciled information specific to the provenance of any print can easily be reconstituted, even if the blank fails. I don't release unmounted GSP's (loose prints) except to art institutions, whereupon stamping may then be employed. Mounting label blanks is only an archival process variation that presently fits my materials/workflow.
Ben
Mark: on 一月, 2012
Mark
Ronald de Jong: on 六月, 2012
I 've enyoed watching your site and video's. Beautifull photo's of amazing landscapes. I was wondering why you don't use a self adhesive material as polystyrene are dibond to paste the pictures.
I paste and frame my pictures myself , but i use different materials for example www.neschen.com
Ronald de Jong
Ben: on 六月, 2012
Suffice to say, that if you are uninterested in commercial sales or archival issues, you are a absolutely free to present your work in any way you like. Archival issues are controversial, but the basic tenant by which the artist must decide is whether or not the work will be permanently (or semi-) affixed to its support (mat board). Once one has made that decision, which is frequently at odds with museum guidelines, it is desirable to use methods most suited to the presentation of flat, two dimensional art. The traditional mounting tissues used correctly for that for this purpose will result in the most aesthetic presentation of a fine art photograph. But to be sure, photographic mounting tissue is nothing more than a structured, buffered adhesive delivery method.
Marco Buonocore: on 二月, 2016
One simple question I have is this: what is your method for attaching the window mat to the backing board with the mounted image? If they are loose, how do you avoid the two pieces shifting out of place?
Thanks!
Marco
Ben: on 二月, 2016
The short answer is that I prefer the mount and widow mat to be separate, since both can be removed from a frame intact and without compromise. Window mats are thus easily replaced, if necessary. Rarely, if ever, is it a concern once in the frame.
Gravity will settle them together at the bottom of the frame if they are cut to the same size. Spring clips, or bent staples/nails in wood frames, will prevent the mats from moving sideways as well as keep the assemblage flat against the frame’s glazing. In any case, a small difference (1/16” – ⅛”) in surround due to inexactness to matching mount and window just isn’t perceivable by the eye in any but the smallest of prints, unless your windows are cut so that relatively more space is available to accommodate a signature at the bottom of the mount. In that case, the whole thing might look out of round, to mix a metaphor. This is one reason why my wells are equidistant all the way around the print. I would only tape a hinge for mount and window if the finished piece was not intended for framing, as in a presentation piece or portfolio.
Transport or shipping unframed artwork is another matter. Archival tissue placed between mounted print and window mat not only protects the face of the print, but also allows the sharp inner beveled edge of the window to ride over, rather than dig into, the edge of a print, if excessive shifting occurs during transport.
Marco Buonocore: on 二月, 2016
I like the idea of keeping the mount and mat separate, and how "gravity will settle them together". That makes a lot of sense, and I will try and see if it works for me. I have seen some of my peers use double sided tape to fasten the mat to the mount, and thought that was a pretty terrible system.
I agree that shipping work is a whole other kettle of fish.
Thanks for writing back, and for all the information you've got on your website - it's very extensive.
Marco
加入留言:
订阅留言